Tutorial 01Setting Up a Subject
Subjects are the foundation of your study planner. Creating separate subjects keeps your exam dates, chapters, tasks, and statistics organized in one place.
1
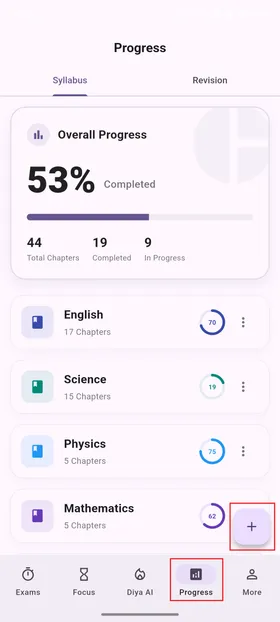
Go to the Progress Tab
Tap the Progress (Syllabus) icon in the bottom menu bar to open your dashboard.
2
Tap Add Subject
Tap the blue circular + Add Subject button at the bottom of the dashboard screen.
3
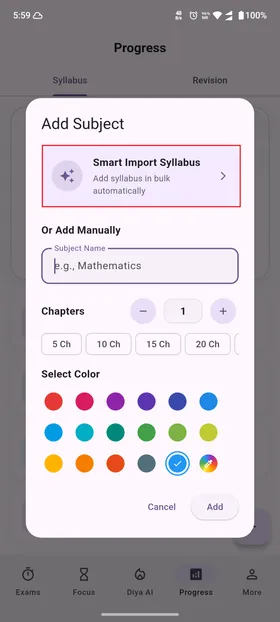
Customize Subject Details
Enter your subject's name (e.g. Chemistry, AP History). Choose a custom subject theme color to keep it distinct on your dashboard. Tap Create.
4
Edit or Delete a Subject
To edit (rename or change theme color) or delete a subject, tap the three vertical dots (options menu) on the right side of the subject card (near the circular progress ring). Alternatively, you can visit Tutorial 03 to easily edit, delete, and reorder subjects.
💡Pro Tip: Give subjects clean, short titles. This helps them render clearly on your home screen widgets and calendar countdown events. You can also insert your whole syllabus using Diya AI, as discussed in
Tutorial 05 - AI Syllabus Import.
Tutorial 02Adding Chapters to a Subject
Instead of viewing a subject as a single large block, break it down chapter-by-chapter. This makes syllabus tracking manageable and highly visual.
1
Select the Subject
From the Progress tab list, tap on the Subject you want to edit (e.g., Biology).
2
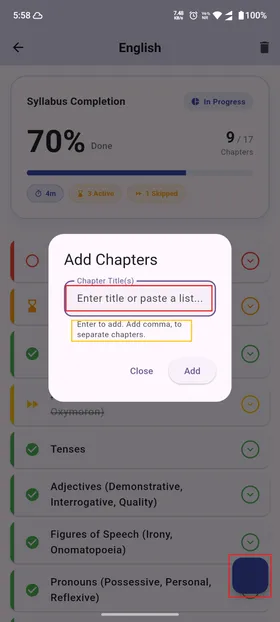
Tap Add Chapter
Look for the Add Chapter [+] input field or tap the add button inside the subject chapter list view.
3
Type and Confirm
Type your chapter name (e.g., 'Chapter 1: Cell division'). Tap return or click add. The chapter is instantly created and ready for tracking.
4
Marking Chapter Progress
Tap on any chapter within a subject to expand its options. From there, you can update its status to In Progress, Done, or Skip. Learn more about this in Tutorial 11 - Marking Progress.
5
Edit or Delete a Chapter
To edit or delete a chapter, tap on it to expand its options. From there, you can change the chapter's name or select the delete option. Alternatively, follow Tutorial 03 to easily edit, delete, and reorder chapters.
Subject Reorder & Management
Keep your syllabus organized. Reorder subjects and chapters to align with your study schedule, and make quick edits or deletions whenever needed.
1
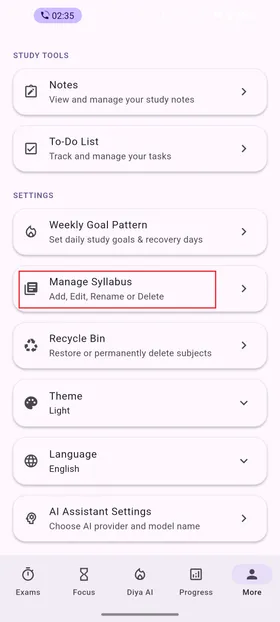
Open Manage Syllabus
Tap the More tab in the bottom navigation bar, scroll down to find Manage Syllabus, and click on it.
2
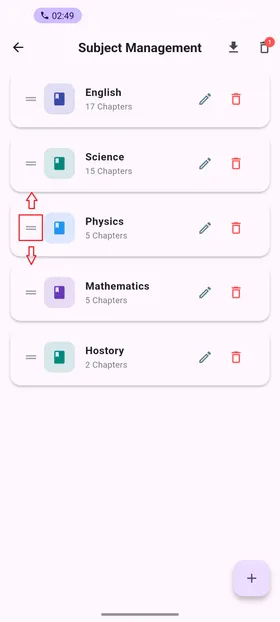
Drag to Reorder Subjects & Chapters
To reorder subjects, press and hold the horizontal line menu icon (drag handle) on the right of any subject and drag it up or down. To reorder chapters, tap on a subject to open its chapters list, then press and hold the horizontal drag handle next to any chapter to sequence them.
3
Quick Edit & Delete
You can edit or delete any subject or chapter instantly by tapping the Edit icon (✏️) or Delete icon (🗑️) next to its name.
Recycle Bin
Accidentally deleted a subject? Access the Recycle Bin to view and restore your deleted subjects before they are permanently purged.
1
Access the Recycle Bin (Trash)
You can directly access the Recycle Bin in the More tab, just below the "Manage Syllabus" button, or on iPad, tablet, or Desktop app, tap the Recycle Bin (trash can) icon located in the top-left corner of the Syllabus page.
2
Restore Deleted Subjects
Find your deleted subject and tap Restore to return it to your active syllabus. You can find and restore your deleted subjects here within 10 days before they are permanently purged. Note: Currently, individual chapters cannot be restored from the Recycle Bin.
Using AI to Import Your Whole Syllabus
Save time typing out dozens of chapter names. Diya AI can automatically generate and import a complete chapter-by-chapter curriculum breakdown for you in seconds.
1
Select Import using AI
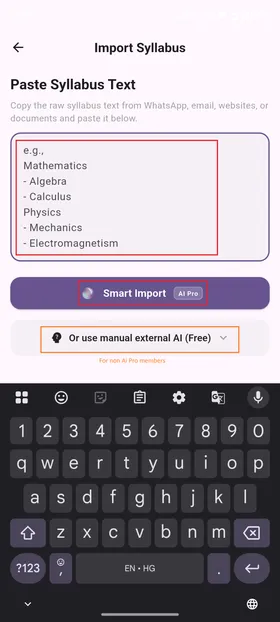
When adding a subject or editing an empty subject, choose the Import using AI option.
2
Tell Diya Your Course Name
Type in your class details (e.g. "NEET Physics Syllabus" or "AP US History"). You can also paste raw text from your school syllabus document.
3
Generate & Confirm
Tap Generate. Review the list of chapters produced by Diya AI. If it looks correct, tap Save and Import to automatically create all chapters instantly.
💡Pro Tip: If the AI misses a specific module, you can manually add more chapters or edit chapter names inside the Subject details page at any time.
Tutorial 06Setting Up an Academic Exam Countdown
Track exactly how many days, hours, and minutes you have left until your exam. Creating a countdown generates healthy urgency and stops procrastination.
1
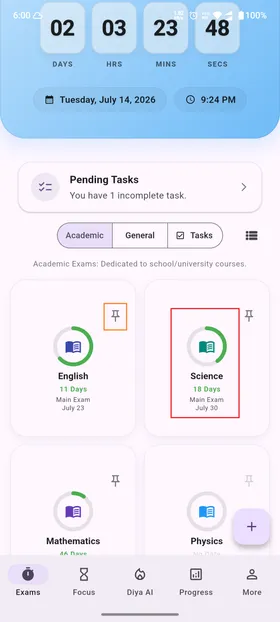
Tap/click on subject
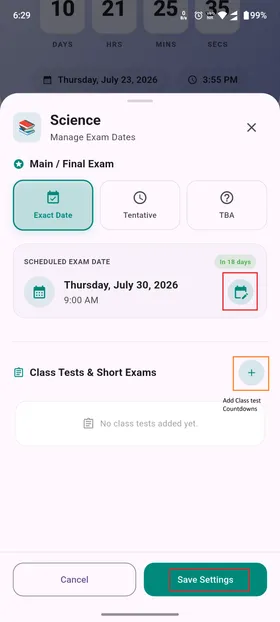
Open the Exam (Home) tab. Select one of your already existing subjects, a Countdown details popup menu will open.
2
Set Exact Date & Time
If your exam date is declared, select the exact exam date. Inputting the official exam start time (e.g. 9:00 AM).
3
Set Tentative Month
If the exam date is not declared, you can select a tentative month by clicking on the Tentative button.
4
TBA or Target Date
You can just set it to To Be Announced (TBA), or you can set a target date for your preparation available in the TBA section.
5
Hero Countdown
Pin any subject or General exam to the Hero countdown by tapping the Pin icon (📌).
Create Birthday, Festival or Competitive Exam Countdown
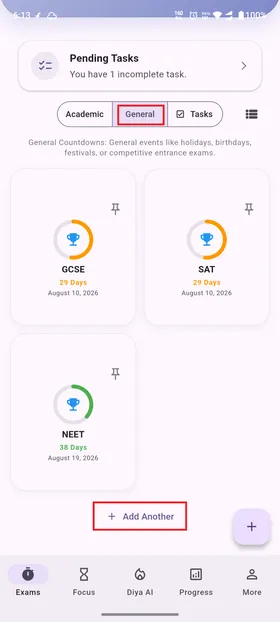
You can create countdowns for non-subject events too! Track assignment submission deadlines, project reviews, holidays, or college application deadlines.
1
Navigate to the Exams Tab
Open the app and select the Exams (Home) tab from the bottom navigation bar.
2
Select the General Filter
Tap the pill-shaped General button situated in the sub-navigation bar (located between the 'Academic' and 'Task' filters).
3
Add Title, Date, and Save
Tap the +Add Another button, provide a title (e.g."Term Paper Deadline" or "Summer Vacation"), select your target date, choose an icon, and tap save.
Adding Home Screen Widgets (Android & iOS)
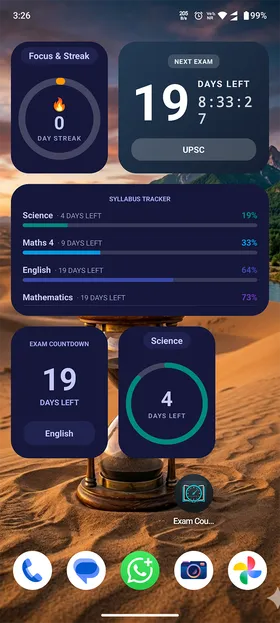
Keep track of upcoming exams, subject completion percentages, target countdowns, and daily study streaks right from your smartphone home screen without opening the app.
1
Long-Press Your Home Screen
On your Android or iOS home screen, press and hold an empty space until the icons start to jiggle or the screen menu appears.
2
Open the Widgets Menu
Tap the + (plus) button at the top corner (iOS) or select Widgets from the bottom menu (Android).
3
Select Study Planner & Pick a Widget
Search or scroll to find Exam Study Planner. Choose your favorite widget style—such as Upcoming Exam, Subject Progress, Exam Countdown, or Daily Streak.
4
Add & Position on Home Screen
Tap Add Widget (iOS) or drag the widget to your desired location (Android). Resize as needed to stay updated with glanceable study metrics all day!
How to Use the Focus Tab
Use the built-in Pomodoro focus timer to keep your sessions productive. Studying in blocks of concentrated attention keeps your brain fresh.
1
Choose Study or Revision Mode
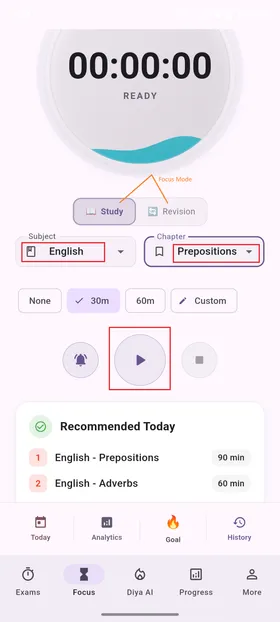
Open the Focus tab and select your focus mode at the top: choose Study for learning new topics, or Revision for reviewing completed work.
2
Select Subject & Chapter
Select the specific subject and chapter you are currently studying. This links your focused sessions directly to your syllabus for detailed progress analytics.
3
Set Goal & Start Focus
Select your target focus duration for the session (e.g. 25, 45, or 60 minutes), then tap the Start Focus (play ▶️) button to open the immersive full-screen focus timer.
4
Configure Pomodoro Intervals
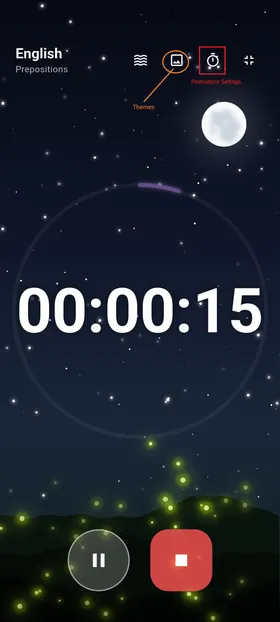
From the full-screen mode, customize your Pomodoro work and break intervals by tapping the clock/timer ⏱️ icon at the top. You can choose custom durations or select presets like Pomodoro (25/5), Long Focus (50/10), or Deep Work (90/15).
5
Change Theme & Atmosphere
Tap the image 🖼️ icon at the top to open the theme menu. Choose between Still Themes (like Zen Black, Rainy Day, Rainy Night, Library, Forest, Sikkim, or Shimla) and Live Themes (like Night Fireflies, Underwater Reef, Night Campfire, Deep Galaxy, Winter Snowfall, Cozy Rain, Autumn Wind, Cherry Blossom, or Synthwave City).
6
Customize Progress Style
Tap the wave/style 🌊 icon at the top to change your progress style. Choose from various premium styles: Liquid Wave, Minimal Ring, Sleek Bar, Sci-Fi HUD, Meteor Trail, or Morphing Blob.
7
Configure Alerts & Notifications
To receive sound, vibration, and notification alerts on your phone when your focus goal is completed, or when transitioning between Focus and Break modes, turn on the alert settings by tapping the alarm bell (🔔) icon.
⚠️Notification Permissions: For alerts to function properly, you must allow notification permissions for the app in your device's system settings.
On Android: Go to System Settings > Apps > Exam Countdown & Study Planner > Permissions > Notifications > Turn On. Under Focus/Break Alarm or Focus Timer, select Sound to choose your preferred alert ringtone.
💡Pro Tip: Your focus sessions and subjects are automatically linked, giving you deep analytics in the statistics tab that illustrate exactly where you spend your study time.
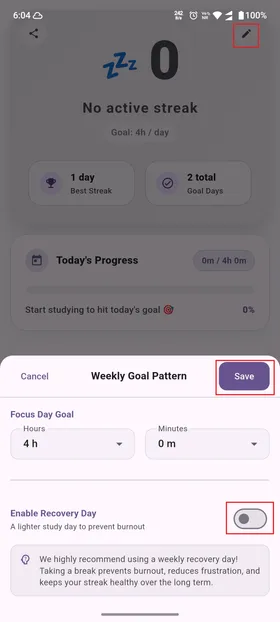
Tutorial 10Setting a Daily Study Goal
Avoid burning out and stay consistent. Rather than trying to cram, set a custom weekly study goal pattern and schedule recovery days to preserve your study streaks.
1
Open Goal Settings
Go to the Focus tab and click on the Goal button at the bottom (near the Analytics and History buttons).
2
Enter Edit Mode
Tap the edit pen ✏️ icon at the top of the Goal screen (as shown in the screenshot) to change your target hours.
3
Set Daily Targets
Adjust your target study hours for each day of the week to set a custom weekly goal pattern (the default is 4 hours/day).
4
Enable Recovery Days
Toggle the recovery day option on designated rest days. This helps prevent burnout while automatically protecting and maintaining your study streak.
How to Mark Progress
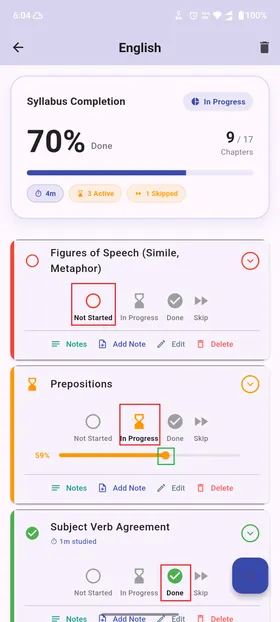
See your preparation progress visually. Marking chapters as you cover them updates the subject percentage bar. Open any subject to view its chapter list.
1
Not Started
By default, each chapter starts in the Not Started state, representing 0% progress toward your subject completion.
2
In Progress
As you study, track your understanding (from 1% to 99%) by dragging the progress slider. Completing a focus session of more than 1 minute for this chapter in the Focus tab will automatically set the progress to 10%. Otherwise, update the slider manually.
3
Done
Mark the chapter as Done when you have 100% completed it. This adds its full value to your overall syllabus completion score.
4
Skip
If a chapter is not on your syllabus, is optional, or you simply want to ignore it, select Skip to exclude it from your subject progress calculations.
Scheduling Revision Sessions
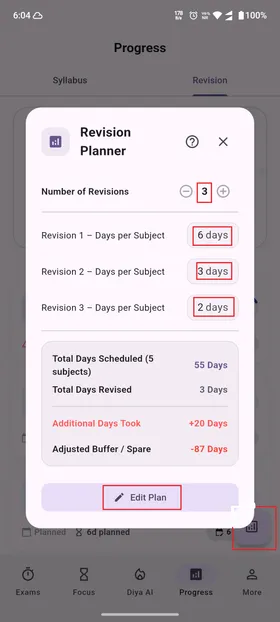
Beating the forgetting curve requires active recall. The dedicated revision planner helps you set revision cycles, customize revision days per subject, and track whether you are ahead or behind schedule.
1
Open Revision Planner
Go to the Progress tab and switch to the Revision sub-tab at the top. Click on the floating action button at the bottom right (with the graph/chart icon) to open the Revision Planner.
2
Configure Revision Cycles
Set your desired **Number of Revisions** and configure the targeted **Days per Subject** for each cycle. The planner automatically calculates and displays your *Total Days Scheduled*, *Total Days Revised*, *Additional Days Took*, and *Adjusted Buffer / Spare* days.
3
Customize Targets Manually
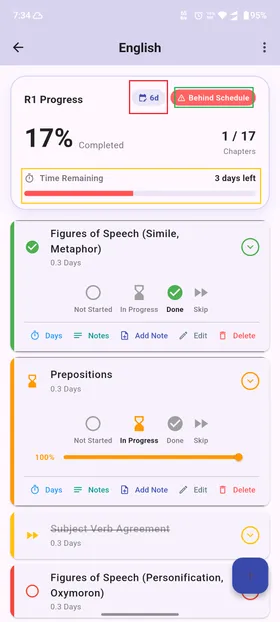
Open any subject card under the Revision tab and tap the **Days** ⏱️ button at the bottom of a chapter card to manually modify target revision days for each specific subject and chapter.
4
Track Schedule Status
The app automatically monitors your pacing and highlights whether you are *Behind Schedule*, *Ahead*, or *On Track*, along with showing the remaining time left (e.g., *3 days left*) to complete the revision cycle.
💡Pro Tip: Keep an eye on your Adjusted Buffer / Spare days in the Revision Planner. If you take additional days on a subject, the buffer will update to show whether you will still finish before your exams.
Tutorial 13Managing Tasks with the To-Do List
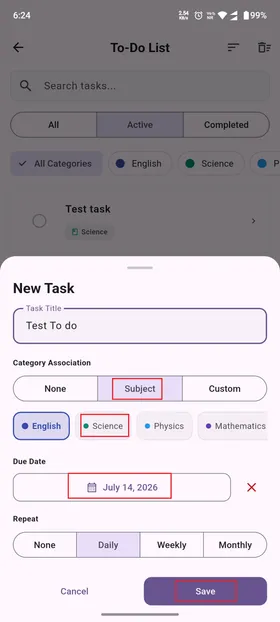
Keep track of homework assignments, practice question sheets, and deadlines. Connect every to-do item to a specific subject to maintain clean lists.
1
Open the To-Do Tab
Tap the To-Do icon in the bottom menu bar.
2
Add Task & Tag Subject
Tap the add task bar, enter the task title, and select which subject it belongs to. Set a priority level (High, Medium, Low) to keep tasks sorted.
3
Check Off Completed Tasks
Swipe or tap the checkbox to archive completed tasks. Use the 'Today' filter to block out future noise and focus on what needs to be done now.
Changing Language Settings
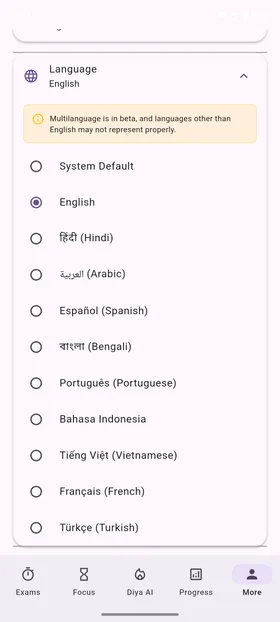
Study Planner is available in multiple languages to support students worldwide. You can switch the app language at any time from your settings.
1
Open the More Tab
Tap the More menu icon in the bottom menu bar.
2
Tap on Language
Locate the Language option at the top of the menu and tap to expand the language list.
3
Select Your Language
Choose from the available options (System Default, English, Hindi, Arabic, Spanish, Bengali, Portuguese, Bahasa Indonesia, Vietnamese, French, Turkish, etc.) to immediately change the app's interface language.
Restoring Premium/AI Pro Purchases
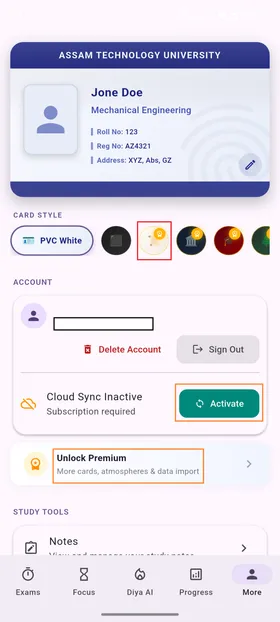
If you've previously purchased a premium subscription or AI Pro features, they usually restore automatically when you log in with your Google or Apple account. If they don't, you can easily restore them manually.
1
Automatic Restoration
Normally, when you log in with your Gmail or Apple account, your purchases are restored automatically. If your premium features are still locked, proceed to Step 2.
2
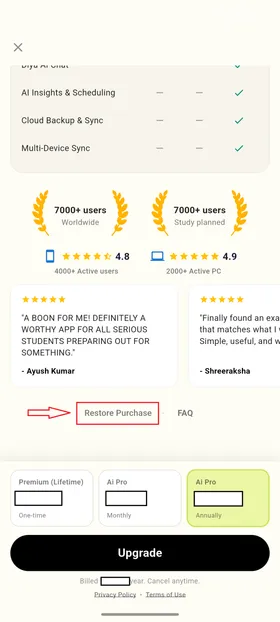
Manual Restore
Tap on any locked premium content to open the premium paywall screen. Scroll all the way to the bottom and tap on Restore Purchase to reactivate your access.
Restoring Premium In Windows PC
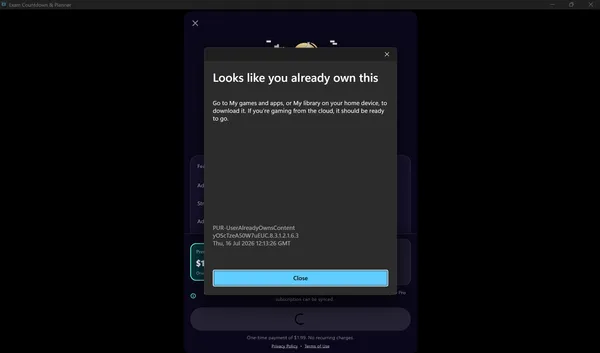
In Windows PC restoring Premium (lifetime) purchase is tough, simply clicking on restore purchase fails most times. Follow these steps to restore the purchase correctly.
1
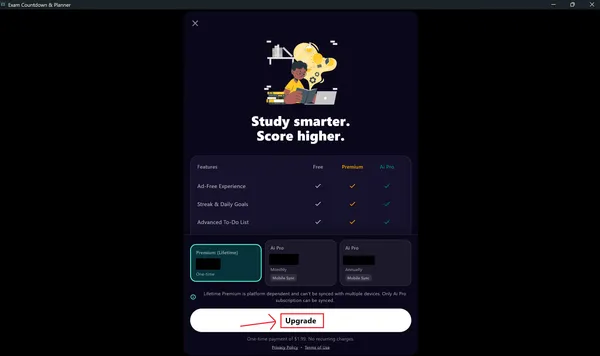
Open Premium Wall
Open the Premium wall by clicking on any premium content inside the app.
2
Click on Upgrade
Click on Upgrade by selecting Premium (lifetime).
3
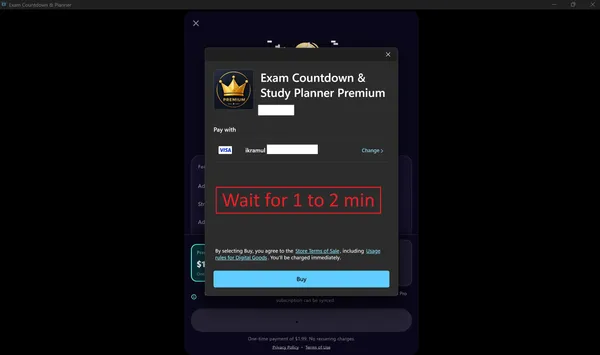
Wait for Restoration
The Store Purchase window will open. There is no need to do anything, just wait a few seconds to a minute and it will restore the purchase automatically.
Redeeming Coupon Code in Windows PC
Learn how to redeem a free premium coupon code in the Microsoft Store to activate Premium (lifetime).
1
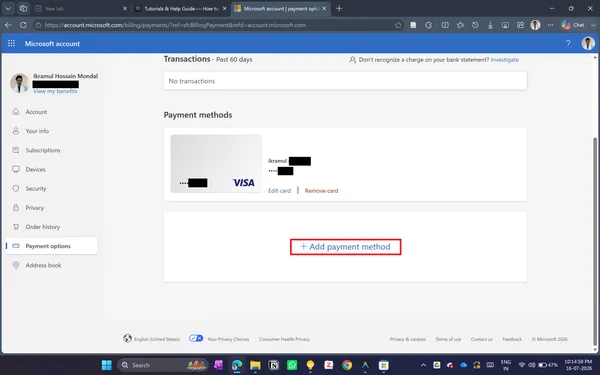
Add a Payment Method
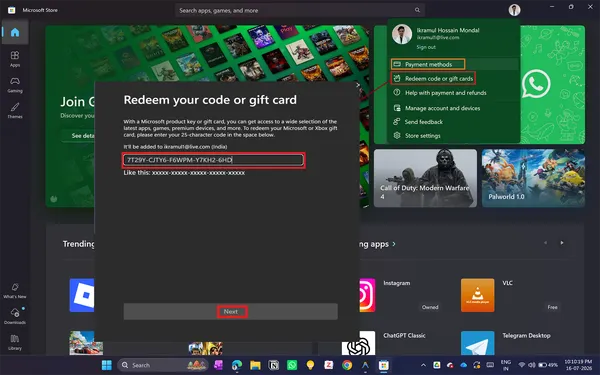
Open Microsoft Store, click on your profile picture at the top right corner. A menu will open, click on Payment methods. A webpage will open; login with the same Microsoft account and add a payment method. Don't worry, it won't charge you. They may charge you a little amount just to verify (e.g. Rs. 1). Without adding a payment method, you can't redeem a free premium coupon code.
2
Redeem Coupon Code
To redeem the coupon code, open the same profile menu in the Microsoft Store and click on Redeem code or gift cards. A pop-up will open. Enter the coupon code and click Next. The coupon will be redeemed successfully.